C# 12: The Experimental Attribute
In the previous blog posts of the C# 12 series you learned about different C# 12 features:
In this blog post, you will learn about another C# 12 feature: The Experimental Attribute.
When you write code, especially when you build a library that is used by many other developers and projects, you might want to flag some features as experimental. Why? Because sometimes you have an idea, but you’re not 100% sure about the API and the implementation. This means the code might change or be removed in the future. But how do you tell this to developers that consume your library? Somehow they should know which features are experimental, and exactly this is where the Experimental attribute enters the stage.
The Experimental Attribute
Since .NET 8, you can use the Experimental attribute (Namespace: System.Diagnostics.CodeAnalysis) to mark a member like a property or a method as experimental. When you do this, a consumer of the marked code will get a compile-time error. This ensures that they are aware that this is experimental code. To use the code, they need to explicitly suppress the error. Let’s take a look at this.
An Example
Let’s create a simple solution with a console application and a class library project. As you can see in the screenshot below, the console application references the class library project:

Now let’s take a look at the Person class that I defined in the class library project. As you can see in the code snippet below, it has a primary constructor with the string parameters firstName and lastName. The created fields with the same names are used as return values for the two expression-bodied properties FirstName and LastName. Then there is also a FullName property that returns an interpolated string. But the interesting part is the Experimental attribute on the FullName property. It marks this property as experimental. To use the Experimental attribute, a using directive for the namespace System.Diagnostics.CodeAnalysis is defined at the top. With the attribute you specify a Diagnostic ID, which is a string that identifies your feature, in this case Thomas001.
using System.Diagnostics.CodeAnalysis;

namespace MyClassLib;

public class Person(string firstName, string lastName)
{
    public string FirstName => firstName;
    public string LastName => lastName;

    [Experimental("THOMAS001")]
    public string FullName => $"{FirstName} {LastName}";
}
In the console application, the class library is referenced. This means that you might think that you can use the Person class there in the Program.cs file like you see it in the code snippet below.
using MyClassLib;
var person = new Person("Thomas", "Huber");
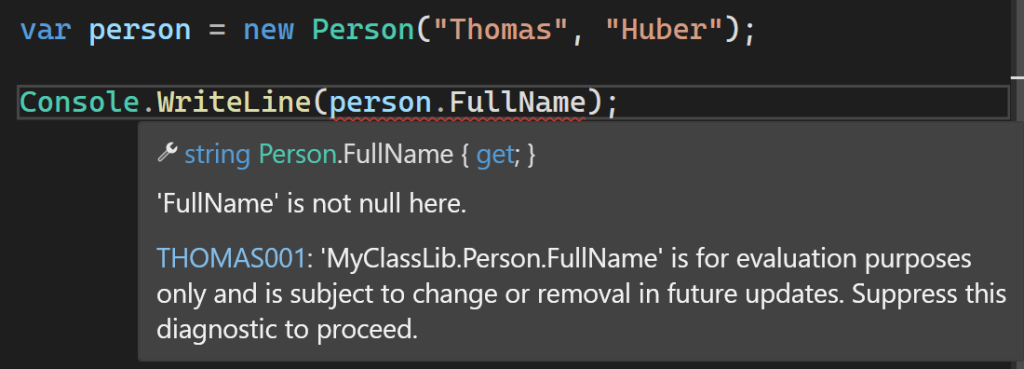
Console.WriteLine(person.FullName);But as you know, the FullName property is marked as experimental, and because of this, Visual Studio underlines it like in the screenshot below in red. When you hover over it, you see the error that says that the FullName property is for evaluation purposes only and is subject to change or removal in future updates. You also see the THOMAS001 Diagnostic ID that I defined with the Experimental attribute.
When you try to build the project, you get this compile-time error like below in the Error List window.
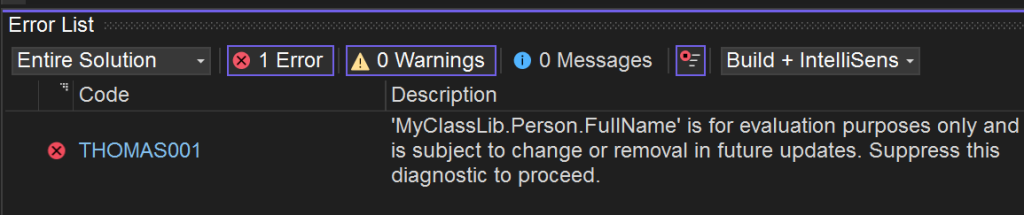
This means, by default, a developer cannot compile their project with your experimental feature, which is great. Before I show you how to compile it, let’s take a look at another feature of the Experimental attribute.
Besides the Diagnostic ID, in this case THOMAS001, you can also define a URL with custom information. When you click in the code editor or in the Error List window on the THOMAS001 error, Visual Studio will navigate to this url that explains how to resolve warnings related to language features and versions.
Instead of using that default URL, you can use a custom URL for your experimental feature. To define a custom URL, you use like below the UrlFormat property of the Experimental attribute.
[Experimental("THOMAS001", UrlFormat = "https://www.thomasclaudiushuber.com")]
public string FullName => $"{FirstName} {LastName}";
Now, when a developer clicks on the THOMAS001 error in their code editor or in the Error List window, the URL www.thomasclaudiushuber.com will be opened in their browser. This feature allows you to define error-specific documentation.
OK, so far so good. Now let’s look at how to use experimental features in your code.
Use an Experimental Feature
To use an experimental feature in your code, you must suppress the warning/error. There are different ways to do this. One way is to use a #pragma warning in your code with the corresponding Diagnostic ID. #pragma is a so-called preprocessor directive, which is a special instruction for the C# compiler. The code snippet below shows how to suppress the warning/error for our experimental feature with a #pragma preprocessor directive. Before using the FullName property, the warning/error for the Diagnostic ID THOMAS001 is disabled with a #pragma warning disable statement. After the statement that uses the FullName property, the warning/error for the Diagnostic ID THOMAS001 is restored with a #pragma warning restore statement. Of course, between disabling and restoring the warning/error, you can have multiple lines of C# code. Now the code below compiles successfully, as you explicitly disabled warnings/errors for the experimental feature THOMAS001.
using MyClassLib;

var person = new Person("Thomas", "Huber");

#pragma warning disable THOMAS001
Console.WriteLine(person.FullName);
#pragma warning restore THOMAS001
Instead of using a #pragma warning preprocessor directive to use an experimental feature, you can also disable the warning/error for the whole project. To do this, you open your .csproj file and you add like in the code snippet below a NoWarn element. Within this element you specify the Diagnostic ID that you want to disable.
<PropertyGroup>
    <OutputType>Exe</OutputType>
    <TargetFramework>net9.0</TargetFramework>
    <ImplicitUsings>enable</ImplicitUsings>
    <Nullable>enable</Nullable>
    <NoWarn>THOMAS001</NoWarn>
</PropertyGroup>
If you have multiple Diagnostic IDs that you want to disable for your project, you can separate them with commas inside of the NoWarn element:
<NoWarn>THOMAS001,THOMAS002,THOMAS003</NoWarn>That’s it. Now you can successfully compile your code that uses an experimental feature.
Summary
As you learned in this blog post, the Experimental attribute is a very simple, but also a very powerful tool for library developers. It allows you to include features in your library that are not in a stable state yet, and that might change or might be removed in the future. Of course, you could have implemented experimental features already before .NET 8.0 and C# 12. But with the Experimental attribute the consumers of your library, which are other developers, get nice compiler errors when they use an experimental feature, and they have to explicitly disable that error to be able to compile their projects.
Thanks for reading, I hope you liked it.
Thomas
Leave a Reply